Stove of the Week: Coleman Xtreme

Clothes, tools, technology, nutrition, training, techniques, etc.
Post Reply
User avatar
Hikin_Jim
Posts: 4686
Joined: Thu Sep 27, 2007 9:04 pm

Post by Hikin_Jim »

Oh, my, look at the time. Another week has passed. It must therefore be time for another "Stove of the Week" (SOTW) post.

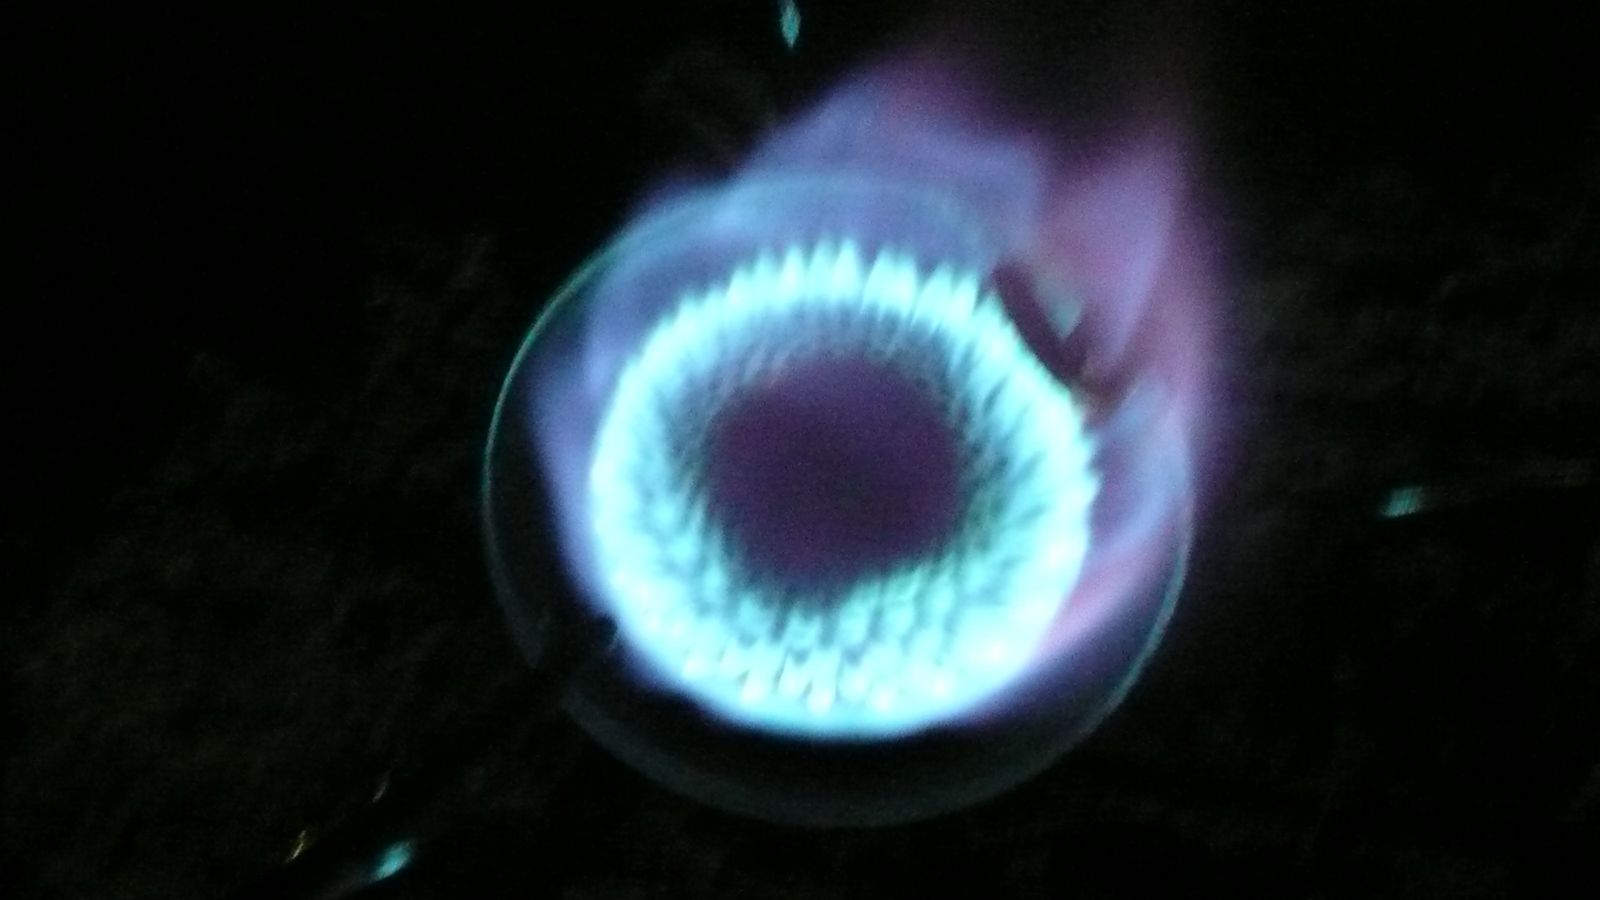
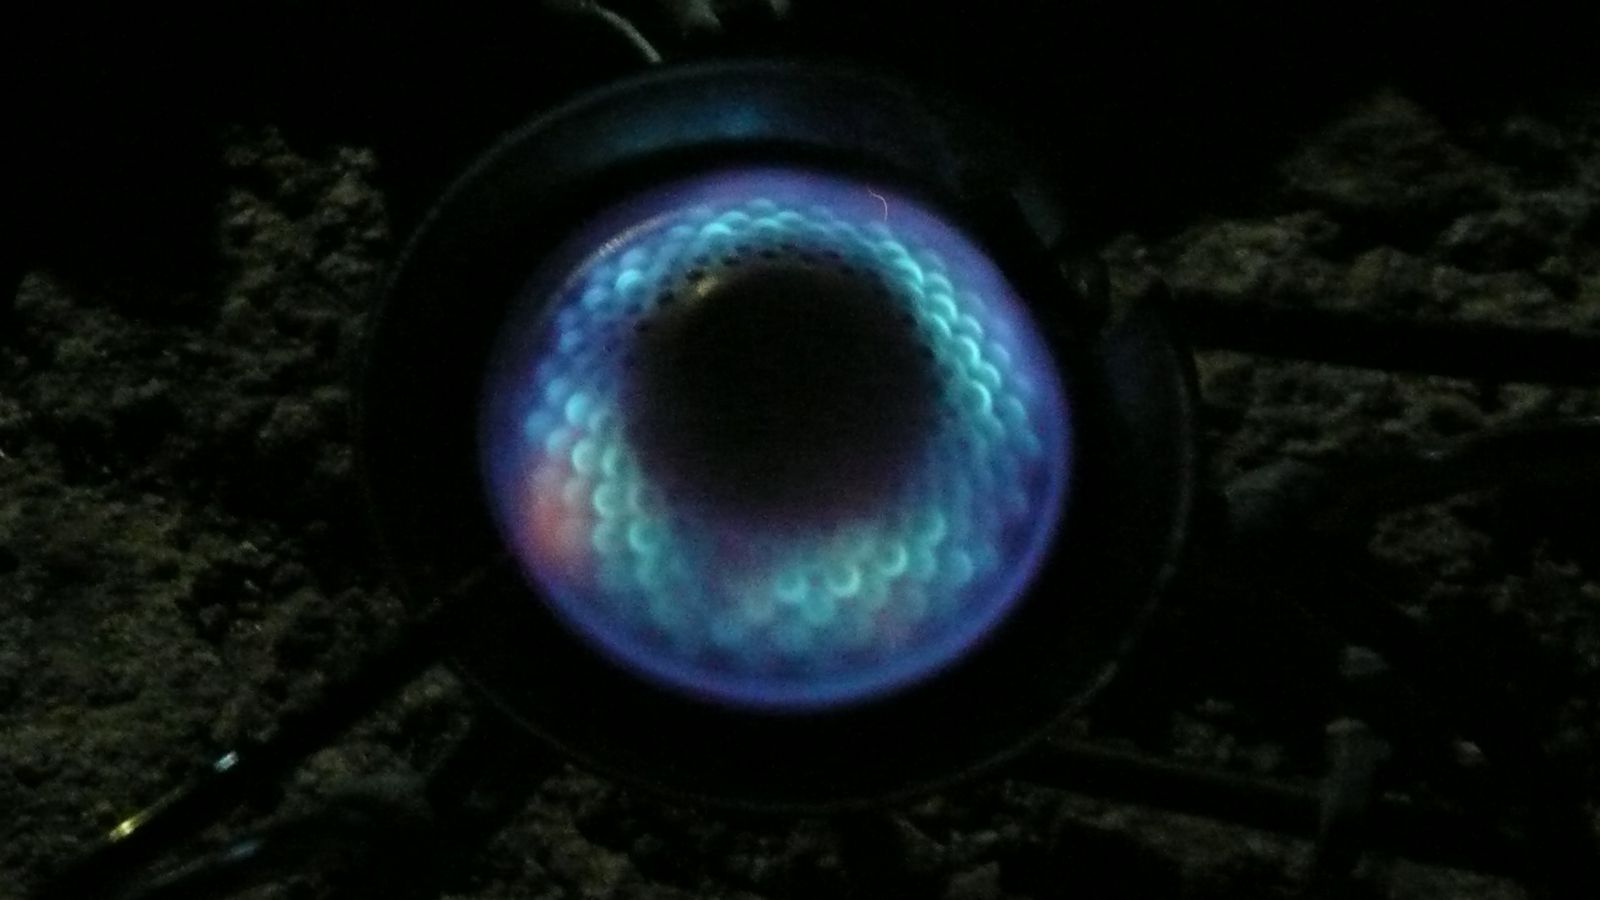
Recently, a friend of mine who enjoys mountaineering asked the proverbial $64,000 question, "what's a good, light weight way to melt snow?" A fair question I might add, and perhaps one that I can actually shed some light on. So, for the next few weeks, my SOTW posts will focus on winter capable stoves. In that vein, this week's stove is the Coleman Xtreme, shown here in full fury.
Image

The Coleman Xtreme is a lightweight, winter capable liquid feed remote canister stove. Coleman rates it as operational down to about -4F (-20C). That's pretty dang good for a gassie. I've read posts on the net indicating that it will operate down as low as -10F (-23C), which is extremely good for a gas stove.

Let's take her for a whirl, shall we? For this week's post, we'll head over to the former Cobb Estate in Altadena, CA, now part of the Angeles National Forest. Here we'll catch the Sam Merrill Trail to Echo Mountain.
Image

At the top, we have a commanding view of the San Gabriel Valley.
Image

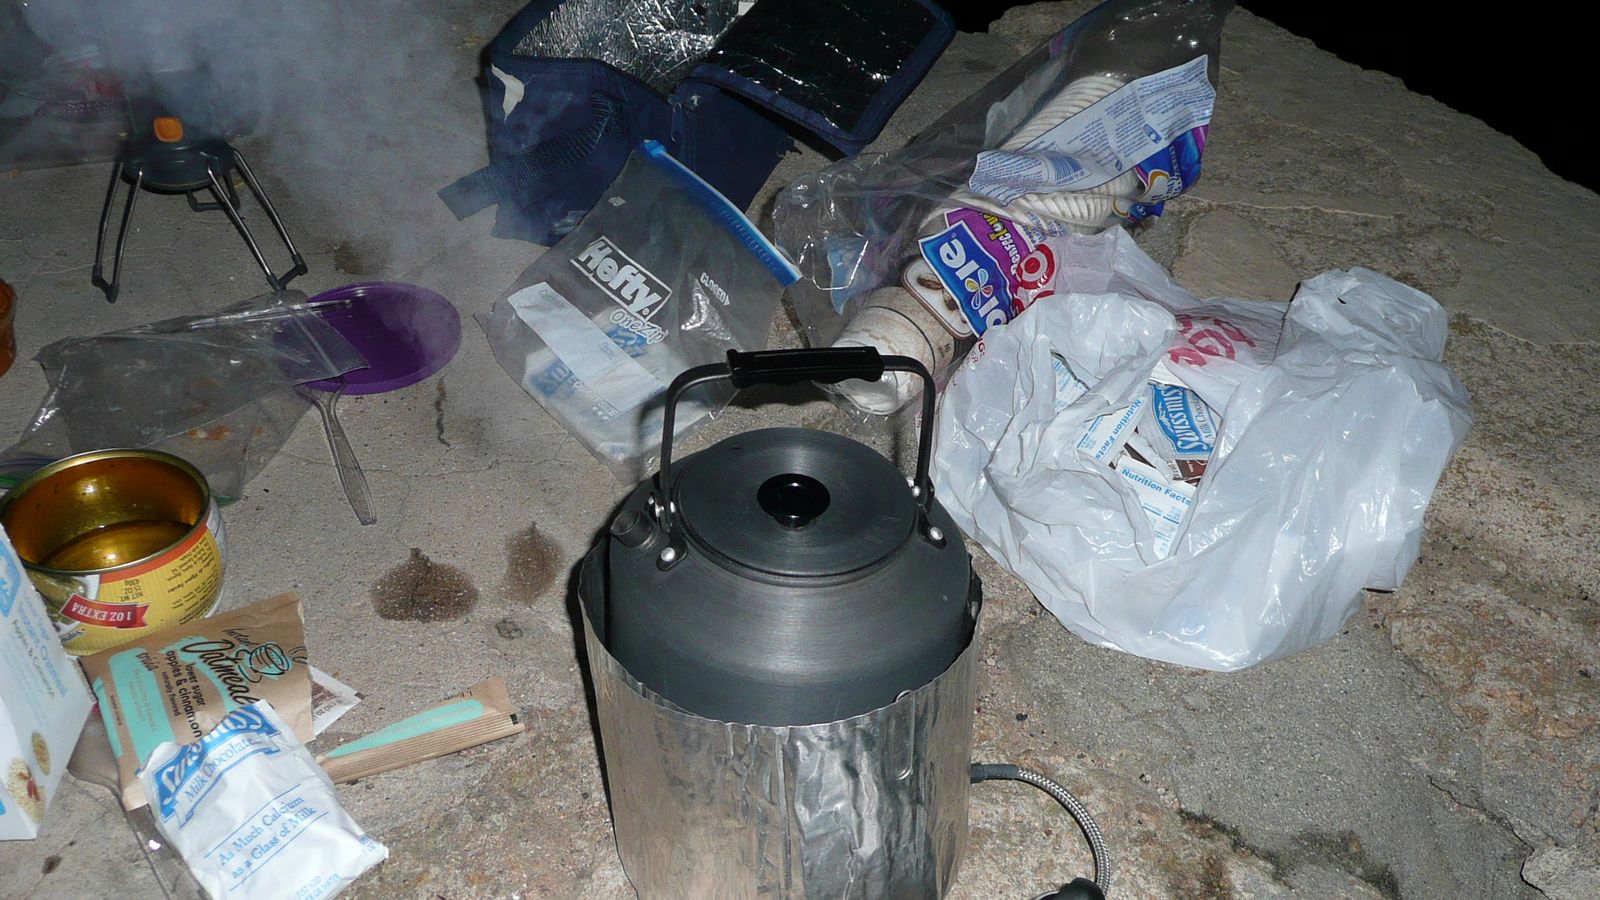
For tonight's stoving, we'll set up here on what remains of the front steps of Echo Mountain House, a hotel built in the 1800's that burned down years ago.
Image

The pot's on to boil!
Image

And in very short order, we've passed the tea test.
Image

So, let's get to know a bit more about this week's stove. For those whose eyes glaze over with details, I'll include a summary at the bottom indicating the pros and cons of this stove for winter use.

Here's a shot of the Xtreme deployed and ready to go.
Image

--WARNING, POTENTIALLY BORING TECHNICAL SECTION--
Before I go too much further, let me define some terms. First, there are generally two types of gas stoves: upright canister and remote canister (yes, there are plenty of exceptions). An upright canister stove is a stove where the burner mounts directly on top of the canister. Examples would include the MSR Pocket Rocket, the Optimus Crux, and the original Jetboil. A remote canister stove's burner is separate from the canister and draws gas via a fuel line. Examples would include the MSR Wind Pro, the MSR Rapid Fire, and the Primus Eta Power.

Second, there are two ways to deliver gas to the burner of a gas stove, vapor feed and liquid feed. In vapor feed mode, the fuel is delivered to the burner as a gas. In liquid feed mode, the fuel, though it would be a gas at room temperature and pressure, is delivered still under pressure as a liquid. You've heard the term LPG (Liquified Petroleum Gas)? That's exactly what this is. The gas is under such pressure that it liquifies into LPG and is delivered in that liquid state to the burner.

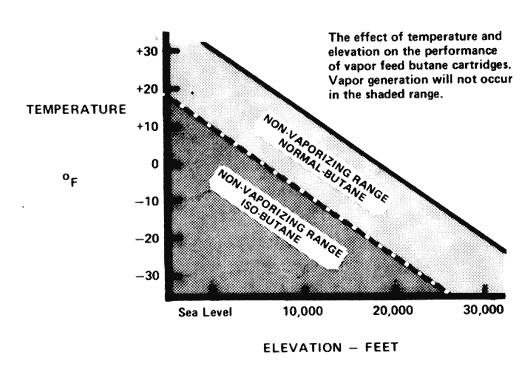
In terms of winter capability, why might it matter in what state the fuel is delivered to the burner? Well, canister fuel typically consists of some mix of the following three fuels: butane, isobutane, and propane. Each of these fuels vaporizes at a different temperature: butane at 31F (-0.5C), isobutane at 11F (-11.7C), and propane at -44F (-42.1C). If you deliver the fuel as a gas, it has to vaporize before it reaches the burner. If the outside temperature is lower than the vaporization point of your fuel, your fuel won't vaporize (it'll stay liquid), and your stove ceases to function. You can shake your canister and hear fuel sloshing around, but your stove is, quite literally, out of gas.

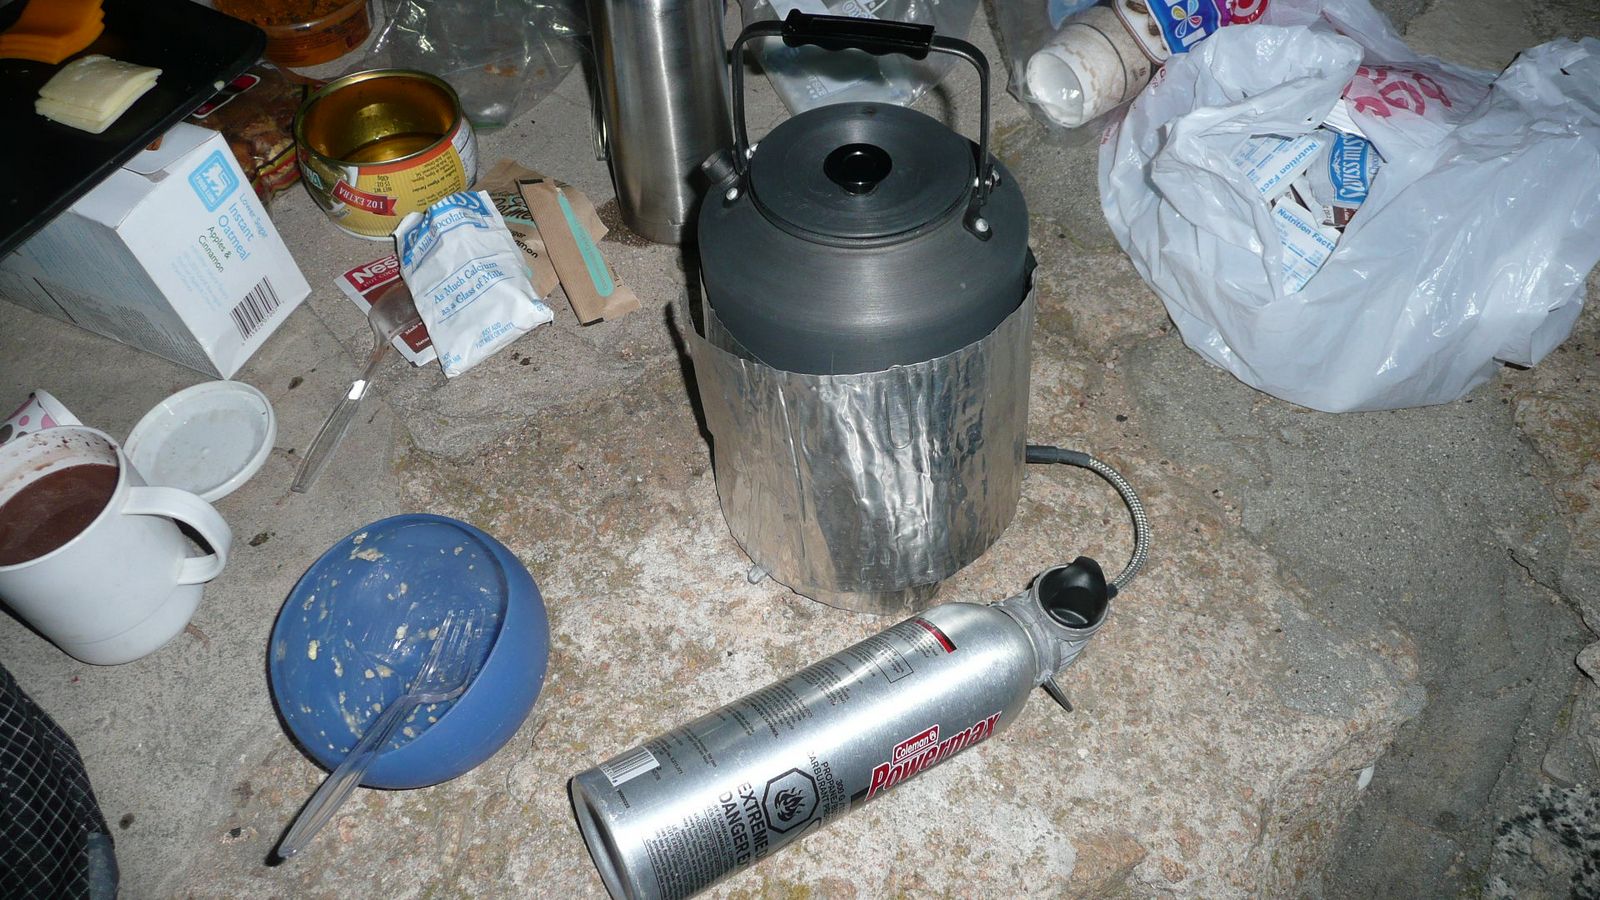
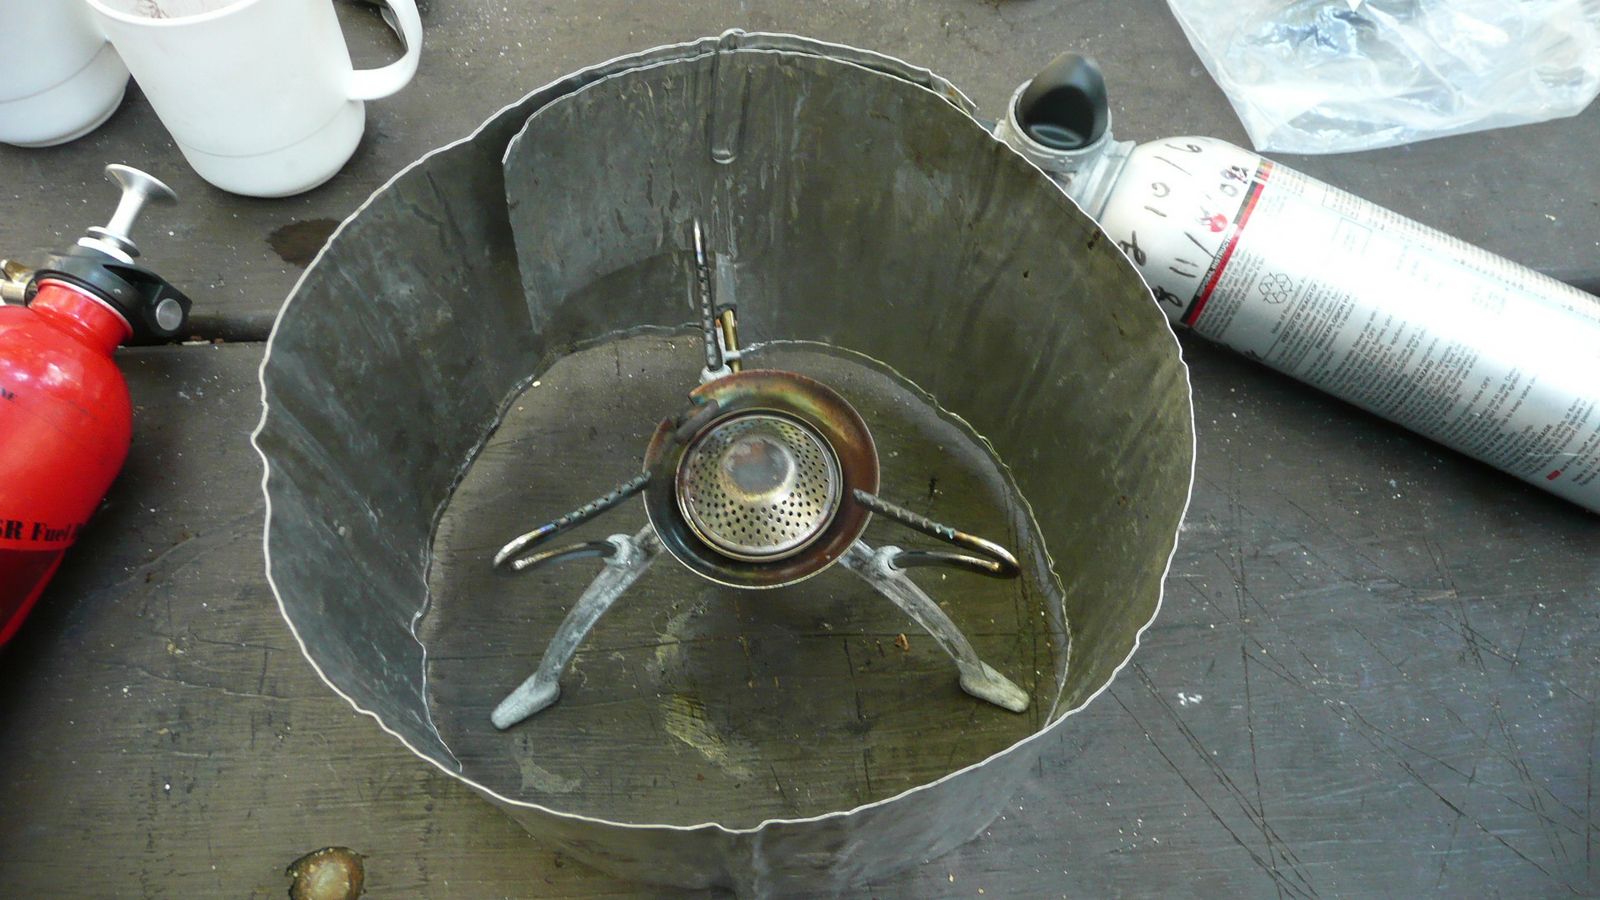
If on the other hand, you deliver the fuel as a liquid, then obviously there's no need to vaporize the fuel as it leaves the tank. Rather, the vaporization occurs at the burner where heat is available from the flame rather than from the surrounding air. In order to heat the fuel to the point of vaporization, typically there is a "pre heat loop" (aka "generator") in the fuel line that extends into the flame. Look at the very first photo in the first post of this thread. Note the dark object in the flame. This is the top of the loop. The fuel flows out of the canister, down the fuel line, and into the loop. The fuel is heated as it passes through the loop, and the liquid fuel turns to vapor, and the vapor exits via the burner and burns.

Hopefully I haven't lost anyone as I've explained this. It is a little bit complicated. If you didn't follow me completely, don't worry about it. The bottom line is that a liquid feed gas stove can be used in temperatures that are much lower than those in which a vapor feed gas stove can be used.
--END OF POTENTIALLY BORING TECHNICAL SECTION--

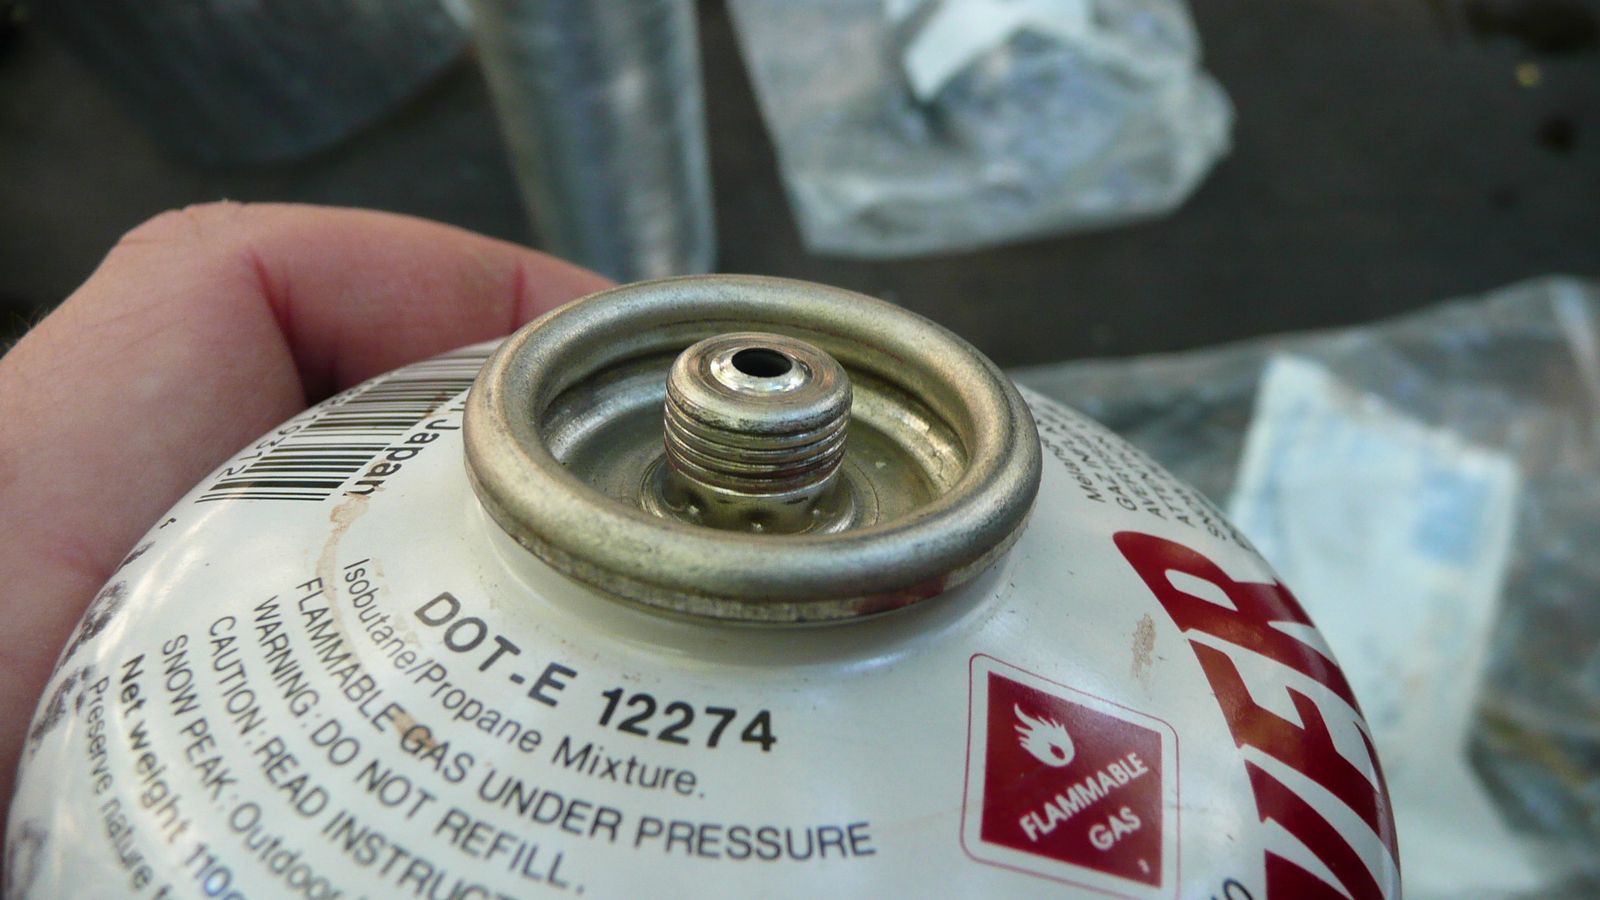
Now then, one thing you should be aware of with this stove is that it uses a special Powermax canister as shown in the photo below.
Image

A Powermax canister has a hexagonal connector.
Image

Note that this connector is completely different than the standard UNEF 7/16" threaded canisters (below).
Image

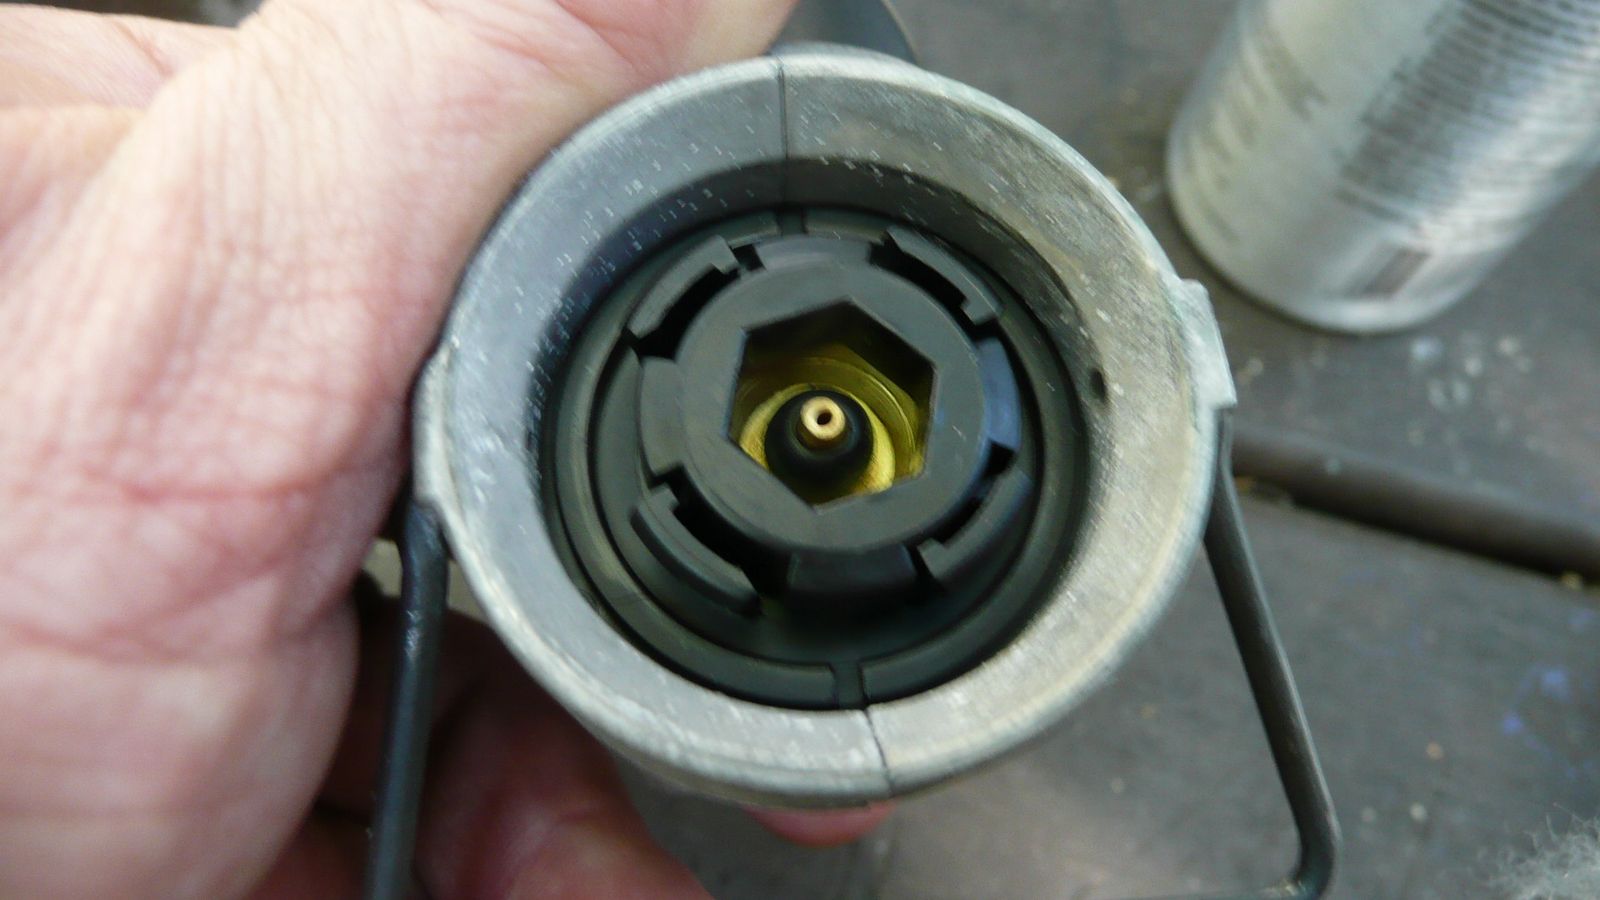
The connector plugs into this assembly on the stove's valve:
Image

It's important to know that this stove uses different canisters because these Powermax canisters are generally less widely available than standard threaded canisters. In major metropolitan areas in the United States, it's generally not a problem. For example here in Los Angeles, Sports Authority, Big 5, REI, and Sport Chalet all carry the Powermax canisters. Elsewhere, such may not be the case. However, because of the stove's nature, it has a loyal following. One just has to make sure that the procurement of fuel is properly planned for.

These canisters do have several advantages:
1) They are made out of light aluminum instead of heavy steel. An empty 300g sized Powermax canister actually weighs less than an empty 100g sized standard threaded canister. You're lugging around a lot less of the dead weight of packaging. Packaging won't cook your supper. Gas will.
2) The canisters are side laying and are designed to feed fuel in liquid form with out the hassle of having to mess with fittings and having to prop up standard threaded canisters so that they'll stay inverted. If that last bit about inverted standard threaded canisters didn't make sense, I'll come to that in another week's post. Stay tuned.
3) The canisters, when depleted, can be punctured and recycled just as you would an aluminum can.

Recall that I said that this is a remote canister stove. Why might that be important? Well, if your canister is directly attached to your burner and you use a windscreen, the windscreen will reflect heat back to the canister. If your canister heats up to somewhere in the neighborhood of 200F (93C), KABOOM!, you no longer have a stove, you have an hand grenade, and let's just say that supper is now the least of your worries.

With a remote canister, the fuel is outside the windscreen. Problem solved; you may use a windscreen without fear, and trust me if you're cooking in cold temperatures (remember, we are talking about melting snow here), you want every advantage you can get. A windscreen not only blocks wind, but it traps heat, making your stove more efficient and keeping you hydrated. Recall that staying hydrated is critical if one is to avoid hypothermia.

An Xtreme with a windscreen (perfectly safe):
Image

Regrettably, though the Xtreme is a fine stove, it never achieved acceptance with the public, and Coleman has discontinued it. Used Xtremes are still available. Coleman is still selling at last check other appliances that use the Powermax canister, and Coleman has publicly committed to continuing to manufacture the Powermax canister. Admittedly, this stove is a fairly specialized piece of equipment, and one has to go to a bit more trouble to procure and fuel it. I submit to you, though, that this stove because of its unique and superior design is worth that extra bit of trouble and is therefore worthy of your consideration as a winter capable stove.

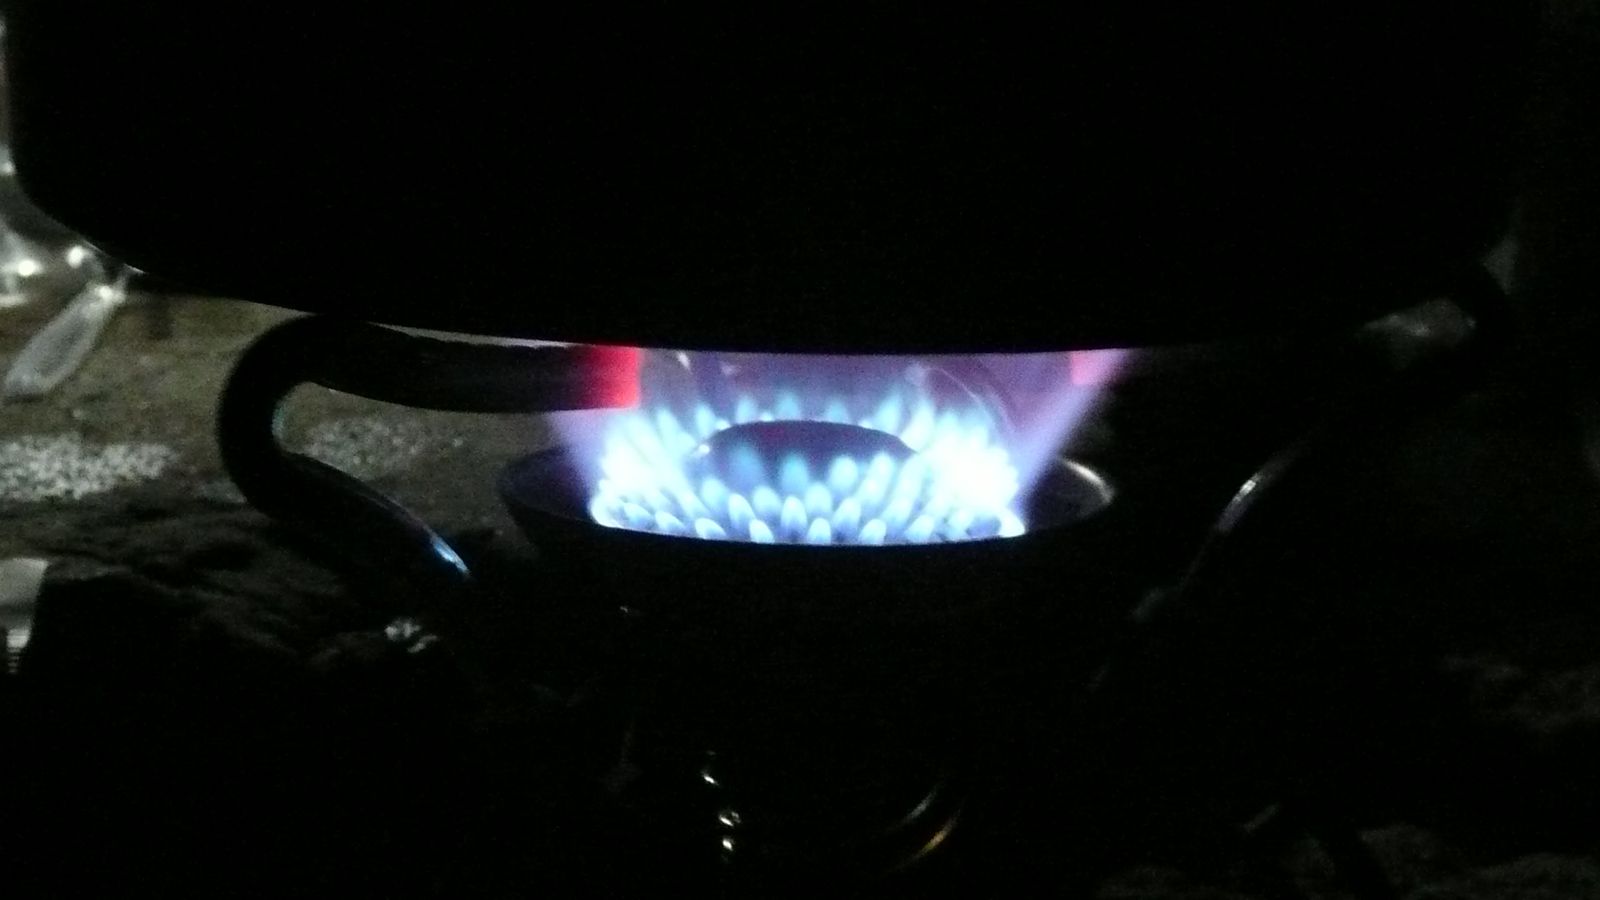
Let me leave you with one more shot of the Xtreme, here demonstrating her wonderful simmering ability.
Image

This has been a most long winded post. I thank you for your patience, and I thank you for joining me in another adventure in stoving.

It's now time to head back down the mountain,
Image
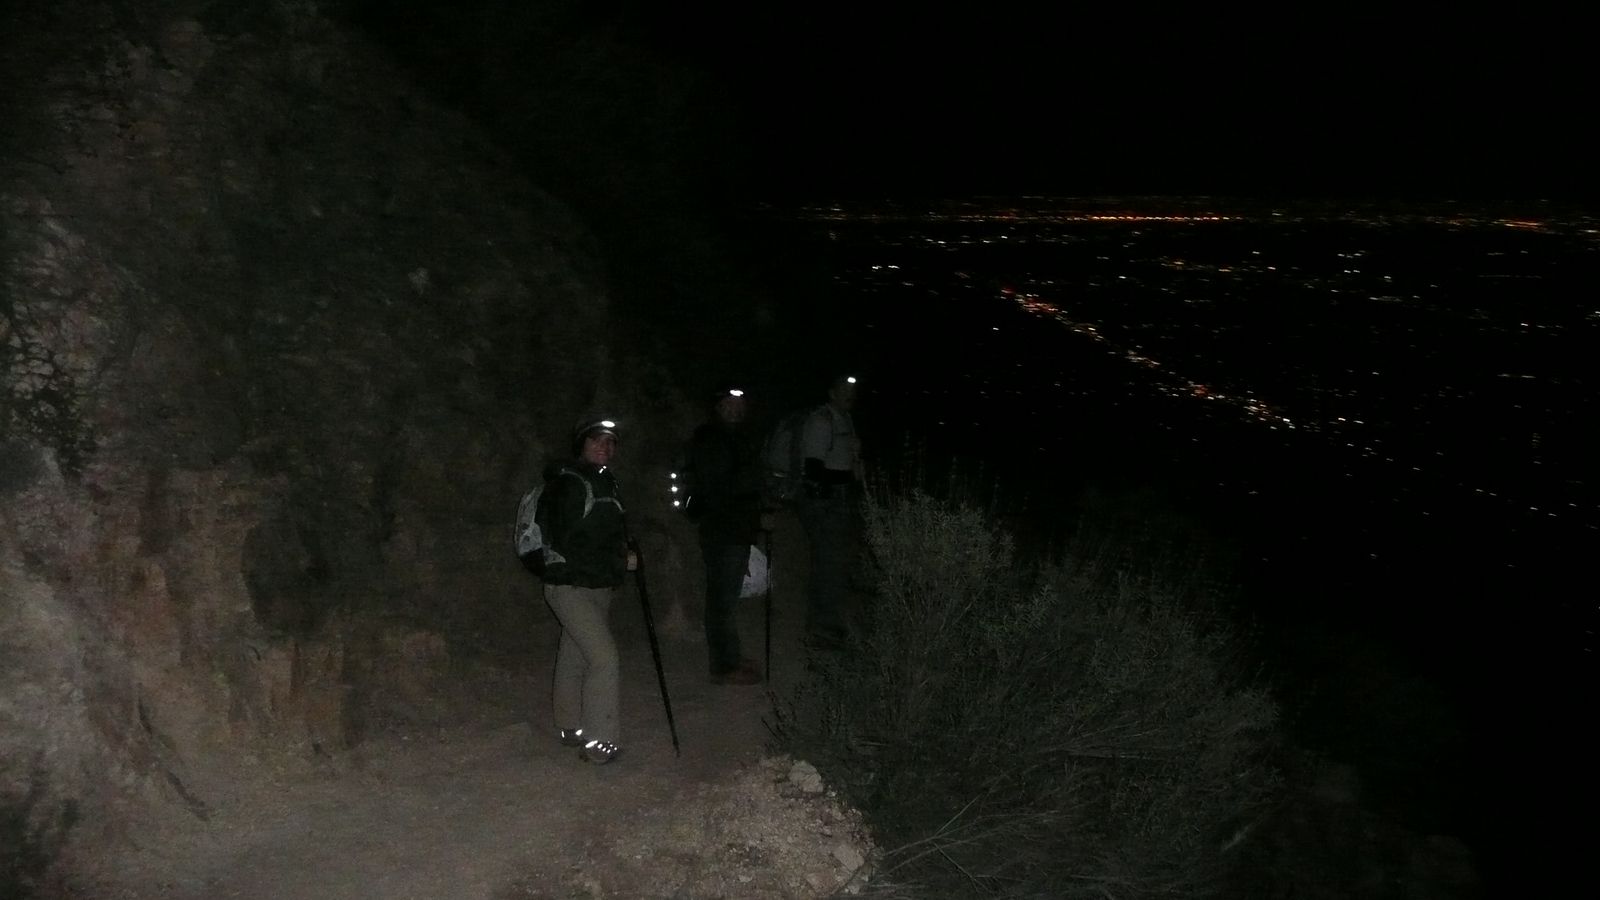
and I therefore bid you good night.

HJ

SUMMARY OF PROS AND CONS
Pros
-A relatively lightweight, stable, wind-resistant (with a screen), winter capable gas stove. The convenience of gas with good cold weather functionality. That's the real hallmark of this stove.
-For a remote canister stove, the Xtreme is lightweight at about 11oz (312g).
-Can use a windscreen safely and easily.
-Rated to -4F (-20C) and quite possibly good down to temps of -10F (-23C).
-Lightweight, easy to use canisters.
-Simmers well
-Quite powerful.
-Fuel is generally less expensive than standard threaded canisters.
-Stable, can handle larger pots than upright canister stoves (you need to be able to handle a bigger pot for snow melting)

Cons
-Discontinued. A used stove must be located*. Parts will eventually become hard to find.
-Powermax fuel is less widely distributed. This will be a problem in some areas and no trouble at all in others.

HJ

*Note: The three legged Xtreme has a four legged sister, the Xpert. Xperts for whatever reason seem to be easier to come by. If you can't find an Xtreme, you may be able to find an Xpert. Xperts typically are less expensive than the Xtreme, but they do weigh a couple of ounces more.
User avatar
Ze Hiker
Posts: 1430
Joined: Mon Jul 28, 2008 7:14 pm

Post by Ze Hiker »

hey you need a StoveScience blog!
User avatar
Hikin_Jim
Posts: 4686
Joined: Thu Sep 27, 2007 9:04 pm

Post by Hikin_Jim »

wrote: hey you need a StoveScience blog!
:lol:

Hey, why not?

In all seriousness, I did try to touch on the physics/chemistry a little bit. You'll notice I avoided talking about how many kcal/mole it takes for phase changes, and I didn't talk about partial vapor pressures over time. I thought I'd spare people the really gory details.

HJ
User avatar
Hikin_Jim
Posts: 4686
Joined: Thu Sep 27, 2007 9:04 pm

Post by Hikin_Jim »

wrote: hey you need a StoveScience blog!
Well, since you mentioned it: Adventures in Stoving.

Guys, let me know if you can read the darned thing and the photos are showing up.

HJ
User avatar
Ze Hiker
Posts: 1430
Joined: Mon Jul 28, 2008 7:14 pm

Post by Ze Hiker »

nice!!! images are showing one. one suggestion: if you go to Design - Layout (or something like that)...you can make the body column wider so your images don't get cut off at all.

might as well document it on a blog since you have so many stoves to go through
User avatar
Hikin_Jim
Posts: 4686
Joined: Thu Sep 27, 2007 9:04 pm

Post by Hikin_Jim »

wrote: nice!!! images are showing one. one suggestion: if you go to Design - Layout (or something like that)...you can make the body column wider so your images don't get cut off at all.

might as well document it on a blog since you have so many stoves to go through
Yeah, and might as well get it all in one place.

All I'm doing is cutting and pasting my SGMDF posts in to Blogger. Pretty amazing that it's preserving the graphics and links.

Thanks for the idea on the column width. I noticed the look wasn't quite right. I just thought I'd try a couple using the defaults and see how it looked.

HJ
User avatar
HikeUp
Posts: 3855
Joined: Thu Sep 27, 2007 9:21 pm

Post by HikeUp »

I like the idea of the blog. Good way to document your collection.

You've got me interested in digging my old stove out of the closet. MSR WhisperLite Internationale - bought in the mid to late 80's (for $59.99 I think). Red cloth covered fuel line, grey & black plastic pump. I have the original box, instructions, wind and heat shields, fuel bottle. I'm gonna try and take pictures and put on my flickr site soon.
User avatar
Hikin_Jim
Posts: 4686
Joined: Thu Sep 27, 2007 9:04 pm

Post by Hikin_Jim »

wrote: nice!!! images are showing one. one suggestion: if you go to Design - Layout (or something like that)...you can make the body column wider so your images don't get cut off at all.

might as well document it on a blog since you have so many stoves to go through
Give it a look now.

Moved the gadgets that were blocking the view over to the left and expanded the body width. Gonna suck if you try to read it on an iPhone.

Maybe I should use smaller photos?

HJ
User avatar
HikeUp
Posts: 3855
Joined: Thu Sep 27, 2007 9:21 pm

Post by HikeUp »

HJ,

Blog looking good. Might want to make your pictures a bit narrower (maybe 80% of what they are now)...they still hang over the right edge of the main body of the blog.
HikeUp wrote: You've got me interested in digging my old stove out of the closet. MSR WhisperLite Internationale - bought in the mid to late 80's (for $59.99 I think). Red cloth covered fuel line, grey & black plastic pump. I have the original box, instructions, wind and heat shields, fuel bottle. I'm gonna try and take pictures and put on my flickr site soon.
Added pictures of my stove.
User avatar
He219
Posts: 386
Joined: Thu Sep 27, 2007 11:18 pm

Post by He219 »

Jim, what portable stove would you recommend that can integrate a simplified manual rotisserie?

We were looking to grill up this squirrel yesterday and figured you'd have a good match. Couldn't find an app for my iphone either ..
:wink:


Maybe a levered kebab skewer over an Esbit fuel cube stove?
User avatar
Hikin_Jim
Posts: 4686
Joined: Thu Sep 27, 2007 9:04 pm

Post by Hikin_Jim »

He219 wrote: Jim, what portable stove would you recommend that can integrate a simplified manual rotisserie?

We were looking to grill up this squirrel yesterday and figured you'd have a good match. Couldn't find an app for my iphone either ..
:wink:
Not sure, but I recommend C4 as a fuel. :wink: :lol:

HJ
User avatar
He219
Posts: 386
Joined: Thu Sep 27, 2007 11:18 pm

Post by He219 »

Hikin_Jim wrote: Not sure, but I recommend C4 as a fuel. :wink: :lol:

HJ
lol, yeah; well done that way alright!
User avatar
Hikin_Jim
Posts: 4686
Joined: Thu Sep 27, 2007 9:04 pm

Post by Hikin_Jim »

HikeUp wrote: HJ,

Blog looking good. Might want to make your pictures a bit narrower (maybe 80% of what they are now)...they still hang over the right edge of the main body of the blog.
Yeah, I probably need to cut he size down from 800 to 640 or something. I'll adjust. Should be pretty easy.
HikeUp wrote:
HikeUp wrote: You've got me interested in digging my old stove out of the closet. MSR WhisperLite Internationale - bought in the mid to late 80's (for $59.99 I think). Red cloth covered fuel line, grey & black plastic pump. I have the original box, instructions, wind and heat shields, fuel bottle. I'm gonna try and take pictures and put on my flickr site soon.
Added pictures of my stove.
Hey, cool! If it's got a fabric covered fuel line, then it's an old one. I know it's old also by the "golf tee" shaped fuel jet. A real classic and definitely late 80's. My 1987 Whisperlite is very similar.

That particular version of the Internationale will work well on Coleman Fuel, but I would not use kerosene even though MSR says you can.

If you want to fire up your old stove, I'm happy to take a look at it beforehand. The number one thing you want to look for is a cracked "O" ring around where the pump seals to the fuel bottle. You may also need to lubricate the pump cup, and you'll want to check for any leaks or anything.

What I do to test MSR stoves is:
1. Visual inspection, particularly "O" rings. "O" rings should be free of cracks and should be soft and pliable. If the "O" ring is hard, replace it, even if it has no cracks. An "O" ring failure can be really, really bad.
2. Pump check. The shorter straw (the one that is farthest away from the valve) should emit air when the pump is, well, pumped. If it doesn't emit air, then you probably need to lubricate the leather pump cup. You have to rotate the collar that the plunger sticks out of about 1/10th of a turn. Be really careful when you do this. The plastic tabs that hold the pump rod to the pump body are famous for breaking. Pull the plunger out and check the leather. If the leather is torn, replace it. If it isn't torn, apply the oil in the little white tube that came with the stove. If you don't have the little white tube, extra virgin olive oil works really well. Pretty much any oil works. Replace the plunger in the body, rotate the collar into position. Recheck the pump.
3. Pressurization Check. I screw the pump to an empty fuel bottle, and operate the plunger about 20x. I then unscrew the pump. Air should burst out of the bottle when you unscrew the pump.
4. Air check. I set everything up just like I was going to fire it up, but I put no fuel in the bottle. I pump it up. I listen for the tell tale "hiss" sound of escaping air. If air escapes, fuel will too under pressure. Gotta fix the leak. If no leaks, I crack open the valve. I listen for air coming out of the jet. If no air comes out of the jet, you have to clear the jet. There should be a wire pricker included in the stuff that came with the stove.
5. Final check. Fire that puppy up! ALWAYS USE THE WINDSCREEN when priming or operating the stove. The windscreen keeps heat away from the fuel tank just as much as it keep wind away from the burner. If any fuel leaks at any time, immediately shut down the stove. Don't ask me how I know that this is important. :oops:

HJ
User avatar
Hikin_Jim
Posts: 4686
Joined: Thu Sep 27, 2007 9:04 pm

Post by Hikin_Jim »

I put up a new post. See if the format is any better.

HJ
User avatar
HikeUp
Posts: 3855
Joined: Thu Sep 27, 2007 9:21 pm

Post by HikeUp »

Width of photos looks good in that new post - good stuff.

The fuel pump for my stove has some cracks in the plastic in the valve area...not sure I want to use it. Are the new pumps available from MSR compatible with the old fuel hoses and bottles? They look like it to me at first glance but was wondering if you knew for sure.

LOL @ stove-fu!
User avatar
Hikin_Jim
Posts: 4686
Joined: Thu Sep 27, 2007 9:04 pm

Post by Hikin_Jim »

HikeUp wrote: Width of photos looks good in that new post - good stuff.

The fuel pump for my stove has some cracks in the plastic in the valve area...not sure I want to use it. Are the new pumps available from MSR compatible with the old fuel hoses and bottles? They look like it to me at first glance but was wondering if you knew for sure.

LOL @ stove-fu!
It's probably going to work with some minor cracks in the valve area. However, modern MSR pumps are compatible with older stoves -- all the way back to the very first stoves from the 70's. You just want to avoid the Dragonfly pump which only works with the Dragonfly.

EDIT: Just looked at the photo with the crack. No big deal. Should not affect performance of the pump.

I have some extra pumps if you're interested, or REI, Sport Chalet, and A16 should all have them.

Thanks for the feedback on the photo size. I think I'll stick with a 640 format instead of 800. Each photo is clickable for a higher res photo.

HJ
User avatar
Dave G
Posts: 321
Joined: Sun Jun 22, 2008 9:51 am

Post by Dave G »

Nice blog, HJ! I too have an old Wisperlite and I'm curious as the difference between it and the Simmerlite. Is it all in the metering valve?

This weekend I'll be going to a very cold place and will need to melt lots of snow. Once again I'm faced with the dilemma of bringing the Wisperlite, which is faster but heavier, more complicated and necessitates bringing a pot, or packing the Jetboil--a lot more convenient but slowww at melting snow, especially at altitudes over ~10K'.

I'm looking forward to your review of the Reactor, because that's what I'm thinking my next stove will be. Also--at what rate does canister efficiency (at a given fill level) drop with low ambient temperatures? My highly unscientific study suggests that you get higher heat output if you sleep with your fuel to keep it warm. A windscreen that could somehow redirect just the right amount of heat to the cannister might be nice--or would it?
User avatar
Hikin_Jim
Posts: 4686
Joined: Thu Sep 27, 2007 9:04 pm

Post by Hikin_Jim »

Dave G wrote: Nice blog, HJ! I too have an old Wisperlite and I'm curious as the difference between it and the Simmerlite. Is it all in the metering valve?
Hi, Dave,

There's no difference whatsoever in the "metering valve." The pump and valve assembly are interchangeable between a Simmerlite and a Whisperlite.

In comparing the Simmerlite to the Whisperlite, here's the positive:
The Simmerlite is lighter than the Whisperlite. The Simmerlite is a bit easier to set up (sliding the legs into place). The Simmerlite is definitely easier to fold up and store and is more compact; the fuel hose is so much more flexible than the Whisperlite's. The legs on a Simmerlite are not easy to deform whereas the legs on a Whisperlite can easily be bent. The Simmerlite's burner head holds priming fuel better than the Whisperlite, which helps when getting the stove started.
And the negative: I find the pot supports to be a bit slick. They can be roughed up with a file. The spirit (priming) cup is very shallow. The shallow spirit cup is fine on level ground, but on uneven ground, the spirit cup may not be able to hold much priming fuel at all. The drawback of a shallow spirit cup is offset in whole or in part by the ability of the burner head to hold priming fuel.
Dave G wrote: I'm looking forward to your review of the Reactor, because that's what I'm thinking my next stove will be.
The Reactor is a snow melting monster. It's the fastest thing I've ever seen, BUT I don't know anyone that would call it light. The four stoves I'm featuring in my blog, the Xtreme, the Simmerlite, the WindPro, and the Borde are all lightweight snow melters. If you like, I can bump up the priority on the Reactor, but it's heavier than either of the two stoves you have now. In really cold weather, the Reactor will shut down pretty much just like any other canister stove. Of course, the higher you go, the colder you can operate a canister stove since the gas will vaporize better in the thinner air found at altitude. I don't know the exact ratio, but as you go higher, a canister stove will work in increasingly cold temperatures.
Dave G wrote: Also--at what rate does canister efficiency (at a given fill level) drop with low ambient temperatures?
Well, the closer you get to empty, the more rapidly pressure falls off. By that I mean, it's not a straight line where things taper off at a constant rate as the canister empties. When you get below, say 20 to 25% full, you may have serious trouble keeping a canister going whereas a full canister would be just fine in the same conditions. I can go into more detail if you like, but the bottom line is you'll have a dead canister long before it's truly empty. Take it to a warmer place, and you'll find you can start cooking again.
Dave G wrote: My highly unscientific study suggests that you get higher heat output if you sleep with your fuel to keep it warm. A windscreen that could somehow redirect just the right amount of heat to the cannister might be nice--or would it?
That is indeed the trick. You have to keep the canister warm in order for the gas to vaporize properly. The standard trick is to put the canister in a pan of water (sleep with a Nalgene). Pretty safe, pretty effective. Put a piece of insul pad underneath the pan so the ground won't suck out all the heat.

Other pretty safe tricks:
Sleep with the canister -- of course that warmth will only last so long as you use the canister.
Bring two canisters, swapping them as one grows cold and keeping the other one in your armpit or your crotch.
Pee on the canister. Gross, but pee is 90+ degrees. Any port in a storm, right?

Risky tricks (by risky, I mean you could wind up dead or in a hospital):
Wrap a copper wire around the canister and run one end into the flame. The copper wire will funnel heat to the canister. Very risky. Too much heat and KABOOM!
Use a fully enclosing windscreen. Again risky.

On those last two, use the "ouch test". Continually touch the canister with a bare hand. If the canister feels hot or you say "ouch" and draw back, SHUT HER DOWN FAST. If that canister gets too hot, you'll have a very powerful explosion with little bits of jagged steel flying every which way at high speed. That would be bad. On the riskier ones, you really have to stay right there by the stove and touch the canister frequently. This isn't one where you fire up the stove and then go off to set up camp or whatever.

You can also use chemical hand warmers although I'm not sure how well they would work.

OK, super long answer. Hope it's helpful.

HJ
User avatar
Hikin_Jim
Posts: 4686
Joined: Thu Sep 27, 2007 9:04 pm

Post by Hikin_Jim »

Here is a chart that shows the vaporization point of n-butane and isobutane as elevation and temperature vary.

Image

I think you can see why mountaineers are successfully using canister gas stoves on Mt. Everest even though it can be very cold.

Propane is not shown in this chart, but propane has a very low boiling point (works great in cold wx in other words) and usually isn't the issue.

HJ
User avatar
Dave G
Posts: 321
Joined: Sun Jun 22, 2008 9:51 am

Post by Dave G »

Hikin_Jim wrote: Here is a chart that shows the vaporization point of n-butane and isobutane as elevation and temperature vary.

Image
HJ
Just what I had in mind, HJ--thanks!

But is all vaporization created equal? In my snow-melting scenario I know I've got vaporization cuz the stove fires up, but me btu's are definitely lacking. :shock: The boiling point decrease with altitude isn't a factor since the melting temp remains the same.
User avatar
Hikin_Jim
Posts: 4686
Joined: Thu Sep 27, 2007 9:04 pm

Post by Hikin_Jim »

Ah, "canister fade" (worse and worse performance as the canister empties), the dread stove disease.

Typical fuel canisters, certainly the Jet Boil ones, consist of three gasses: butane, isobutane, and propane.

Each of these fuels vaporizes at a different temperature: butane at 31F (-0.5C), isobutane at 11F (-11.7C), and propane at -44F (-42.1C). If you deliver the fuel as a gas, it has to vaporize before it reaches the burner. If the outside temperature is lower than the vaporization point (boiling point) of your fuel, your fuel won't vaporize (it'll stay liquid), and your stove ceases to function. You can shake your canister and hear fuel sloshing around, but your stove is, quite literally, out of gas.

As the temperature declines and you pass each one of those vaporization points, you lose one of the components of your pressure and as the canister empties you also lose pressure just from the reduced amount of fuel. Also, because propane has the lowest vaporization point, it has the highest pressure and burns off faster than the rest. In other words, in cold weather your best fuel gets used first, and only your crappier fuels are left toward the end.

All three of these things contribute to "canister fade."

You've got a few choices:
1. Keep the canister warm, but you'll still have canister fade toward the end, and in really cold weather, keeping the canister warm is either difficult or dangerous.
2. Switch to a liquid feed gas stove. You're still using the same three fuels (butane, isobutane, and propane), but the burner is doing the vaporization, so the outside temperature isn't as big of a deal.
3. Go with liquid fuel (white gasoline or kerosene).

Here's Hikin' Jim's general temperature range recommendations:
40+ F Gas, Liquid Feed Gas, or Liquid Fuel will all work well.
30F - 40F Gas, Liquid Feed Gas, or Liquid Fuel will all still work, but you're going to start to notice degraded performance on gas.
20F - 30F Gas, Liquid Feed Gas, or Liquid Fuel will all still work, but you're going to notice degraded performance and you're going to have to start using tricks on gas with many gas brands.
10F - 20F You're getting below where gas stoves operate. If you're headed out in this kind of weather, do your self a favor and upgrade to a different type of stove. Yeah, if you fiddle with it enough, you can get your regular gas stove to work, but basic tricks don't work well down this low, and more advanced tricks are dangerous. Dangerous as in severe injury or death.
0F - 10FThis is simply below the operational range of ordinary gas stoves. This is where liquid feed or liquid fueled stoves rule the day.
-10F - 0FNo way in heck on regular gas stoves. Even liquid feed gas stoves can have trouble as you approach -10F. Specialized liquid feed gas stoves like the Coleman Xtreme will handle the cold better.
< -10F Liquid fueled stoves only.

OK, so there you have it. Those are "rules of thumb" and are a general guideline only. No guidelines can cover all circumstances and conditions. Those are guidelines that are going to work fairly well at most elevations. If you're going above 15,000', feel free to adjust the numbers as needed.

Dave, in your particular case, I'd draw the line somewhere around 20 to 25 degrees F. If temps are getting below that line, then bring your Whisperlite. A Reactor might be able to go down to 15F, but you're pushing it, and you're going to get a lot of canister fade.

All of the above are ballpark numbers at best. So much depends on other things like wind, how you use the stove, what tricks you employ, how full is your canister, which brand of gas you're using, how sheltered a spot you're in, are you cooking in a tent or out in the open, etc.

HJ
User avatar
Dave G
Posts: 321
Joined: Sun Jun 22, 2008 9:51 am

Post by Dave G »

Thanks, HJ. Wisperlite's packed. :)
Gonna make one of the other guys carry the cookset. :wink:

On another, but also stove, subject: Got a trick way to tell how much fuel is left (prefferably in minutes of burn time) in a cannister if you don't have a scale and/or don't know the weights? The "frost line" method notwithstanding. :lol:
User avatar
Hikin_Jim
Posts: 4686
Joined: Thu Sep 27, 2007 9:04 pm

Post by Hikin_Jim »

Dave G wrote: Thanks, HJ. Wisperlite's packed. :)
Gonna make one of the other guys carry the cookset. :wink:

On another, but also stove, subject: Got a trick way to tell how much fuel is left (prefferably in minutes of burn time) in a cannister if you don't have a scale and/or don't know the weights? The "frost line" method notwithstanding. :lol:
You mean you don't carry a precision gram scale to measure your fuel canisters? :wink:

I usually plan out in advance, how much water I'm going to need to boil, how much fuel I'll need based on the amount of water I'm going to boil, and then I bring the appropriate sized/filled canisters. I fill my own canisters, so I can custom fill as needed. Usually, with good planning, I don't have to worry about how much gas I've got left.

However, I do have kind of a rough and ready way of estimating it: I take a full canister and float it in a pan of water, and I make a mark where the water line is. I take an empty canister and float it in a pan of water, and again I make a mark where the water line is. I now know where the water lines will be on empty and full canisters, and I can copy those lines to other canisters.

Out in the field, I'll float the canister. Where the water line falls between the full and empty marks allows me to get a rough idea of how much gas I've got left. Kind of a kludge, but it does work. Of course, in cold weather, be aware that some of your fuel may not vaporize.

Alternatively, there's the shake method. Shake the canister. If it feels/sounds pretty full, that's good; if it sounds empty, that's bad :lol:

HJ
Post Reply